#tag
Vue3-源码学习的笔记
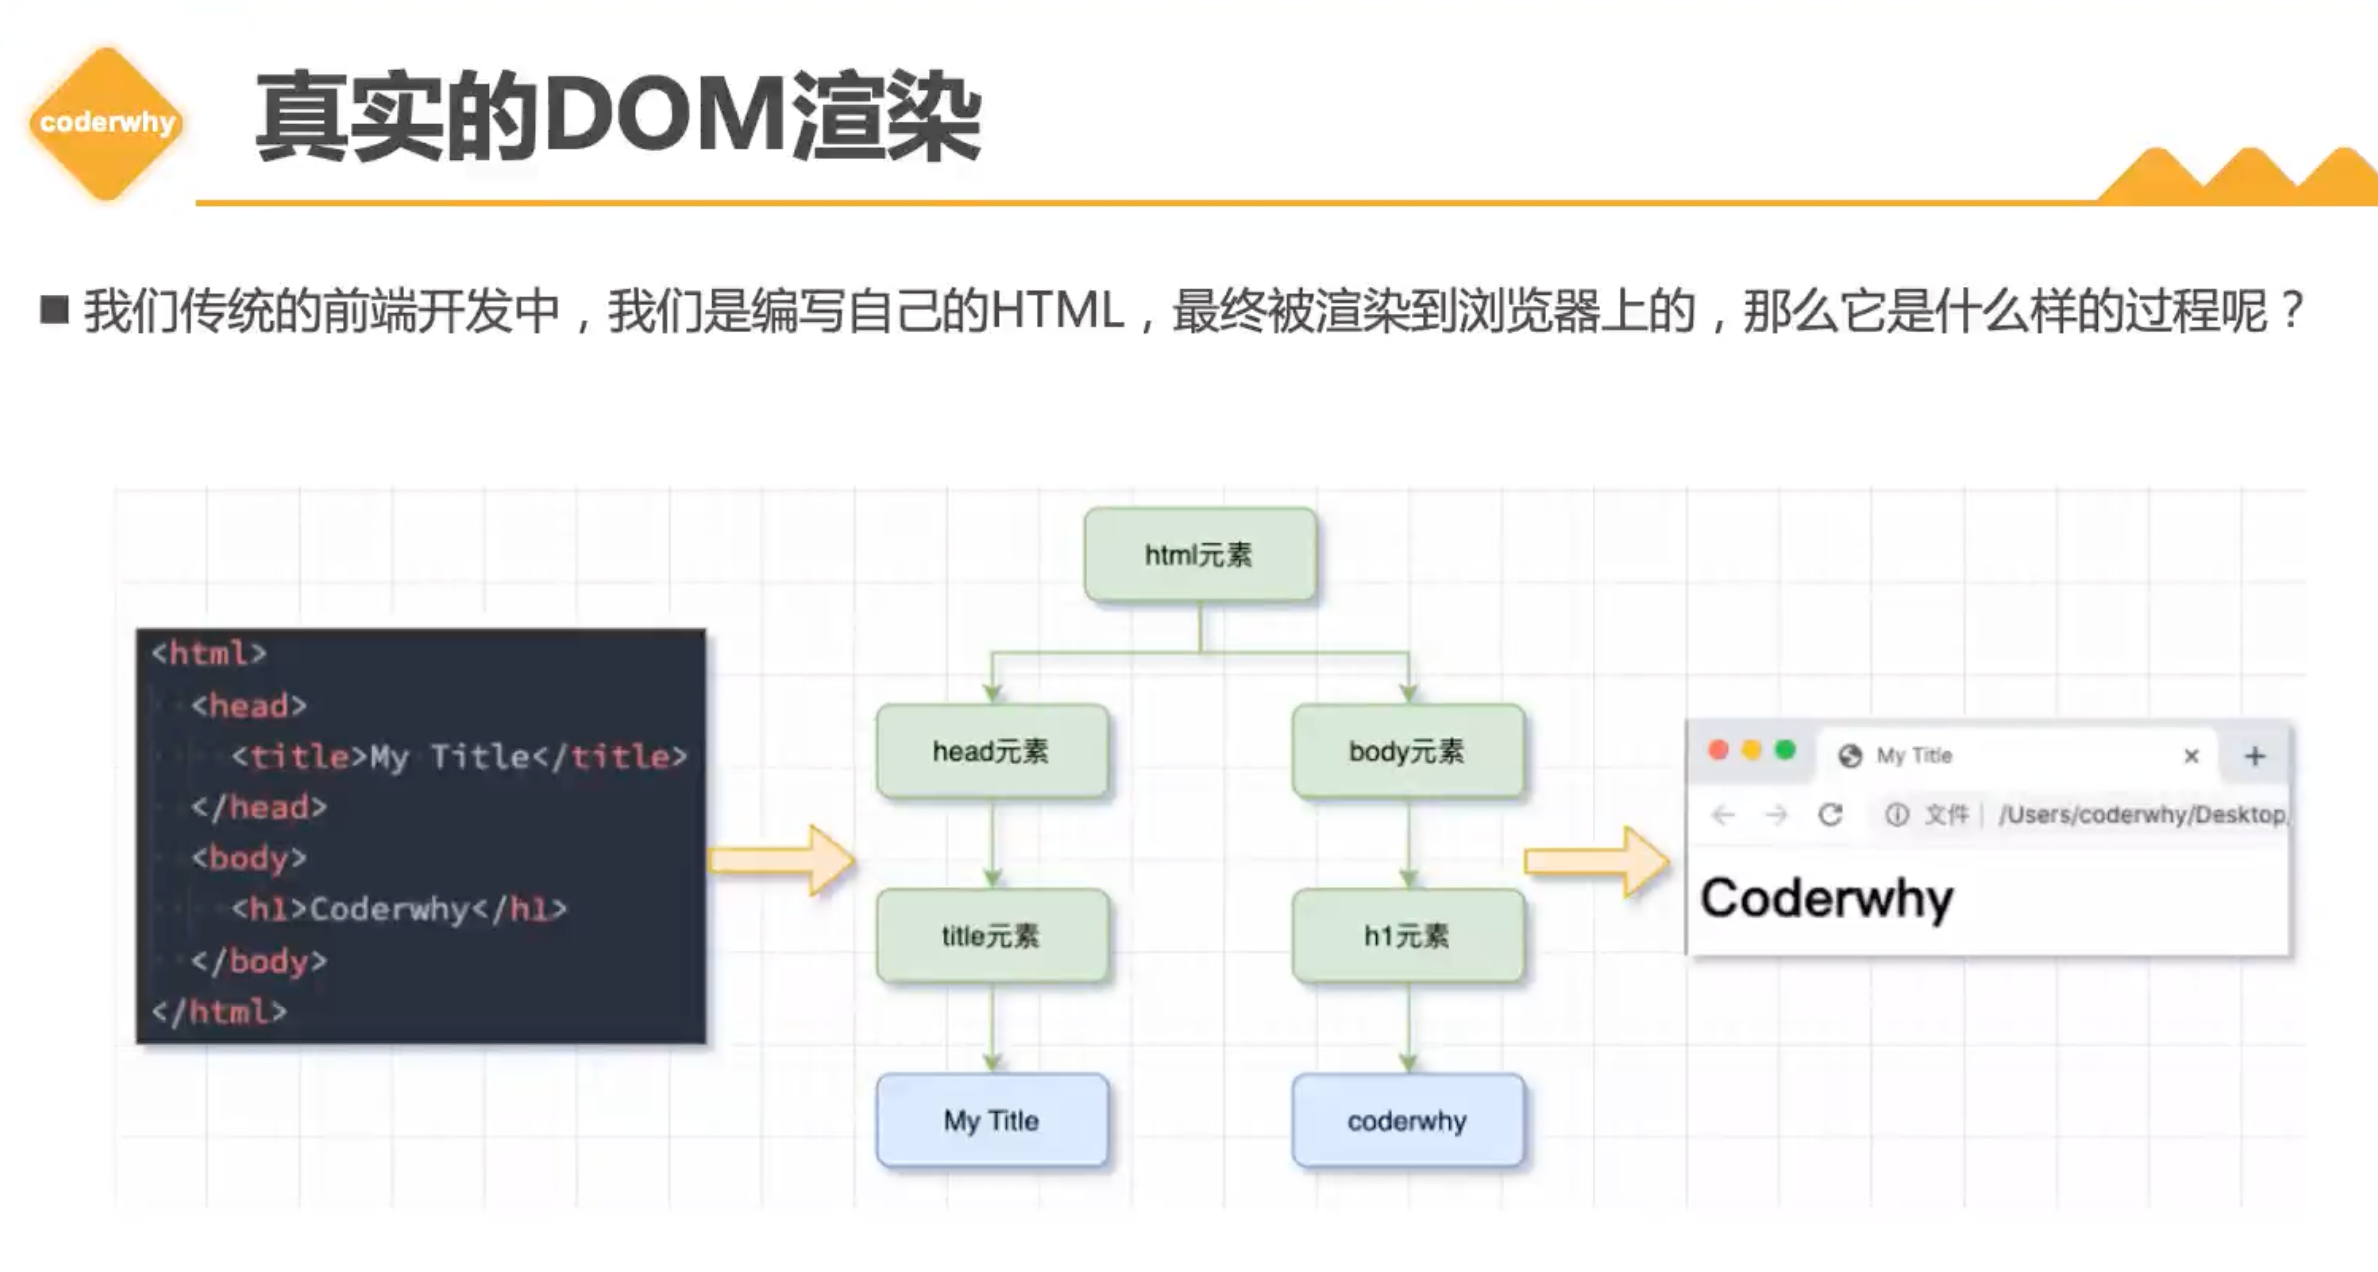
真实DOM的渲染
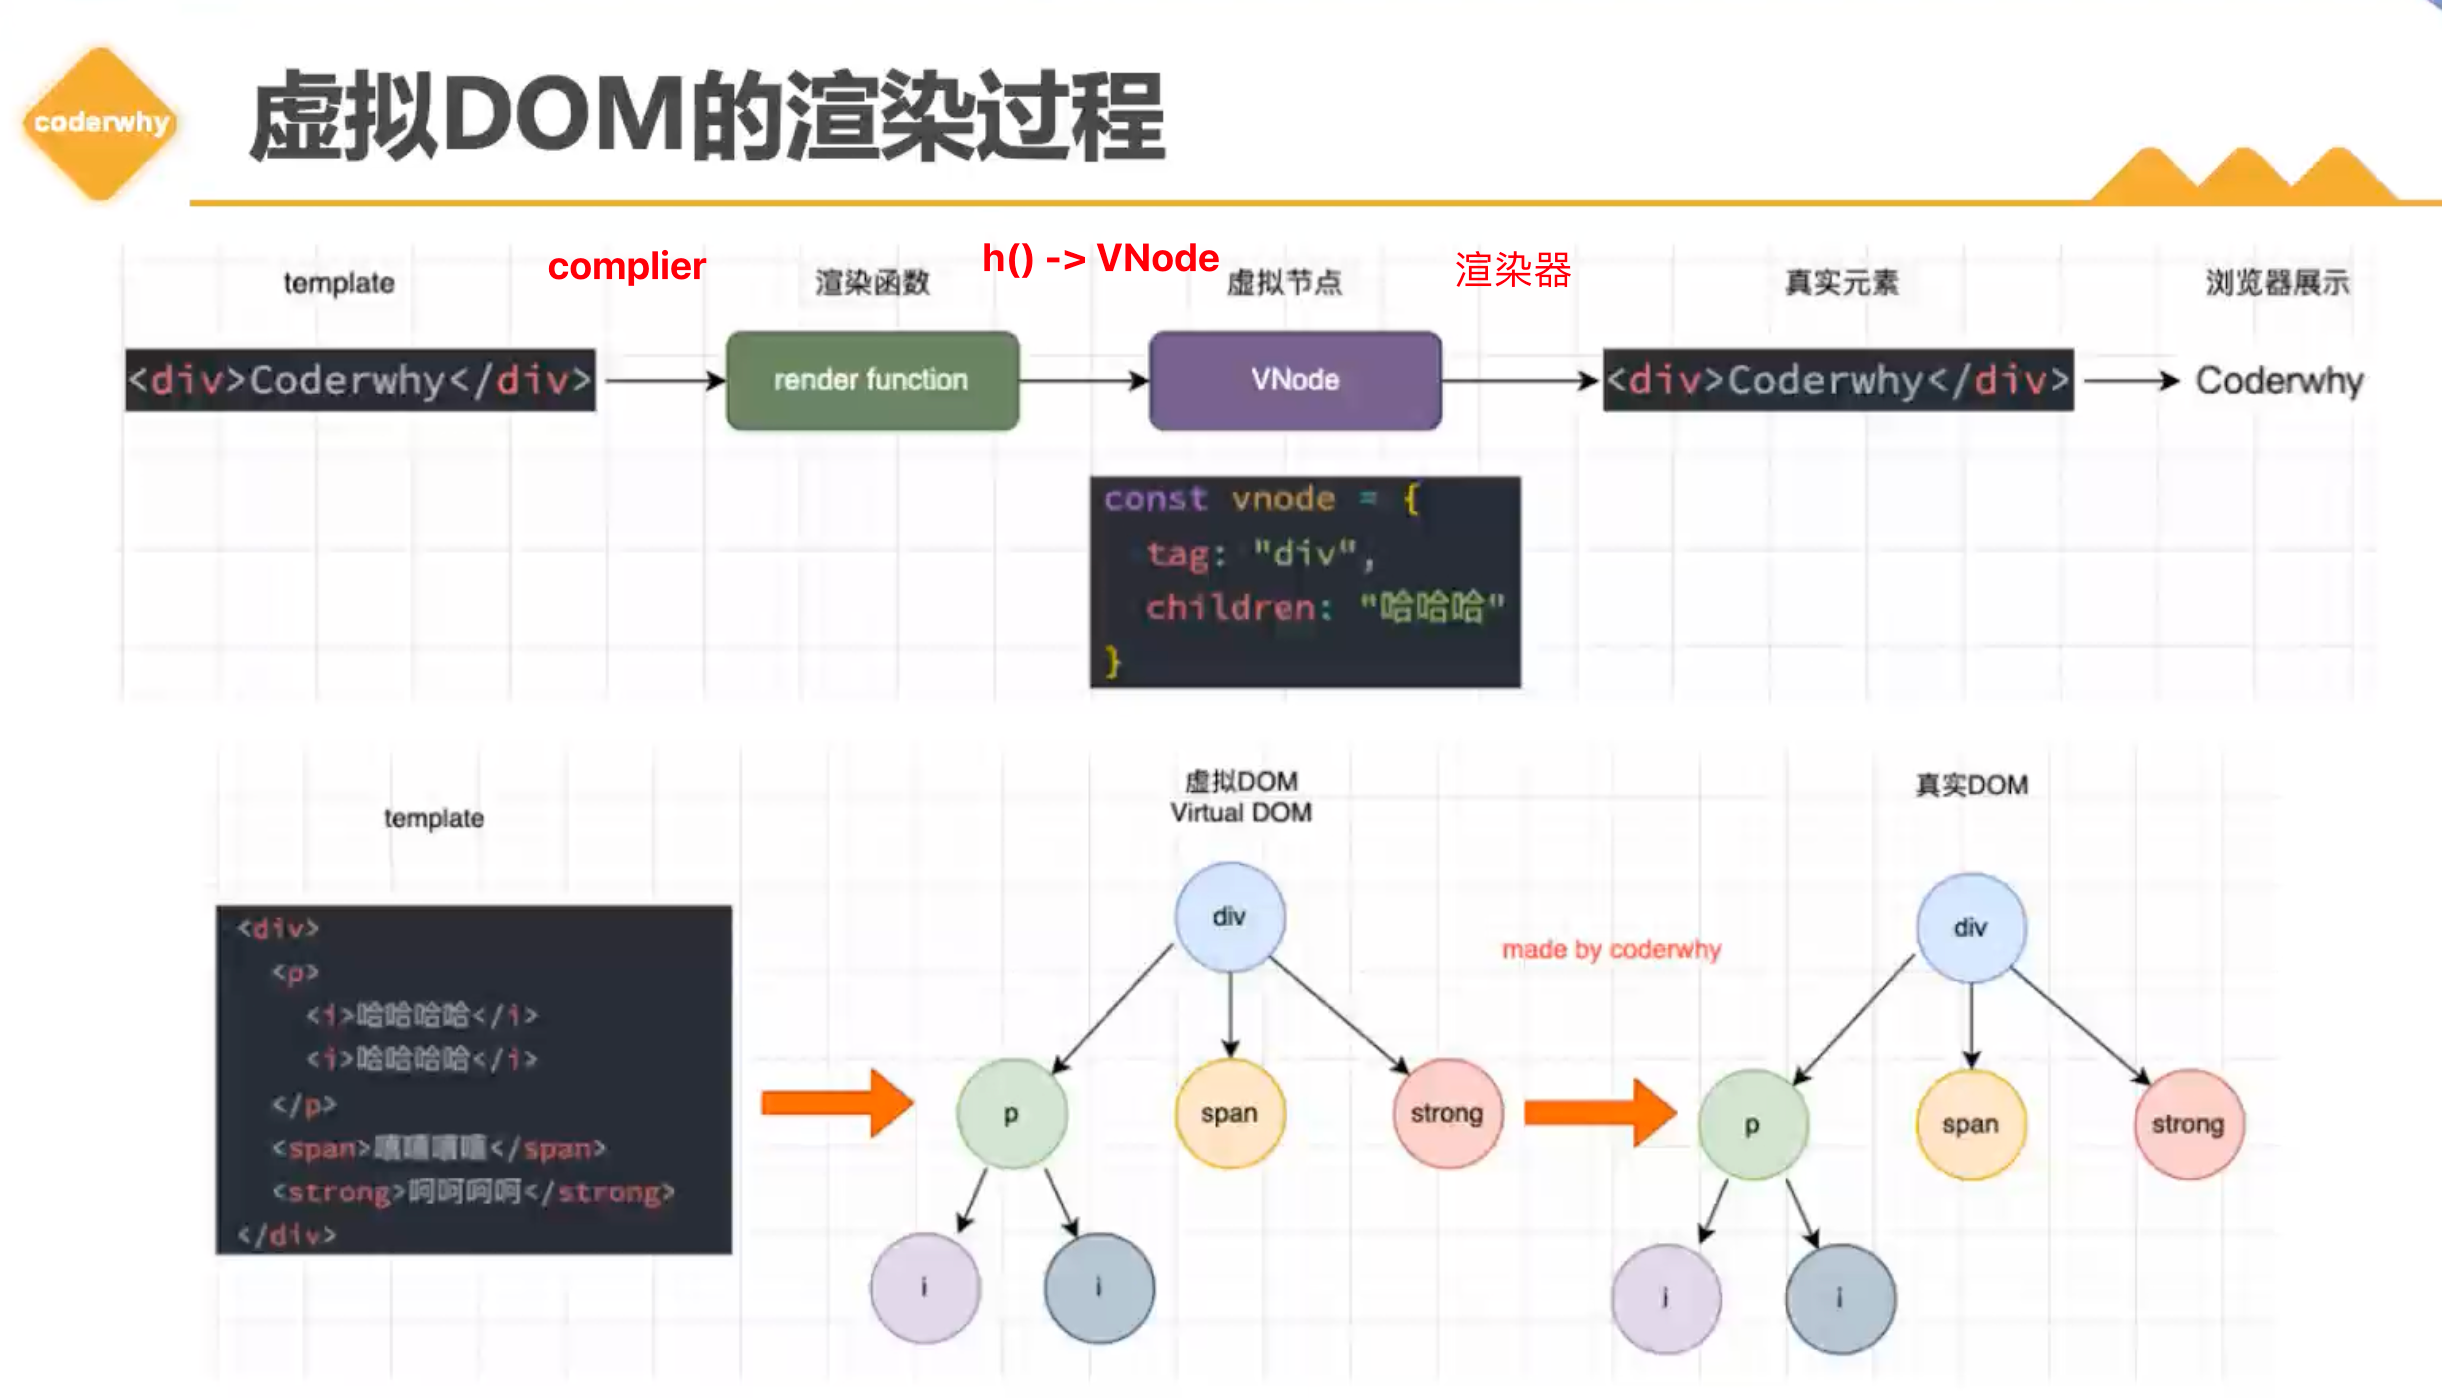
虚拟节点的优势

虚拟DOM的渲染过程
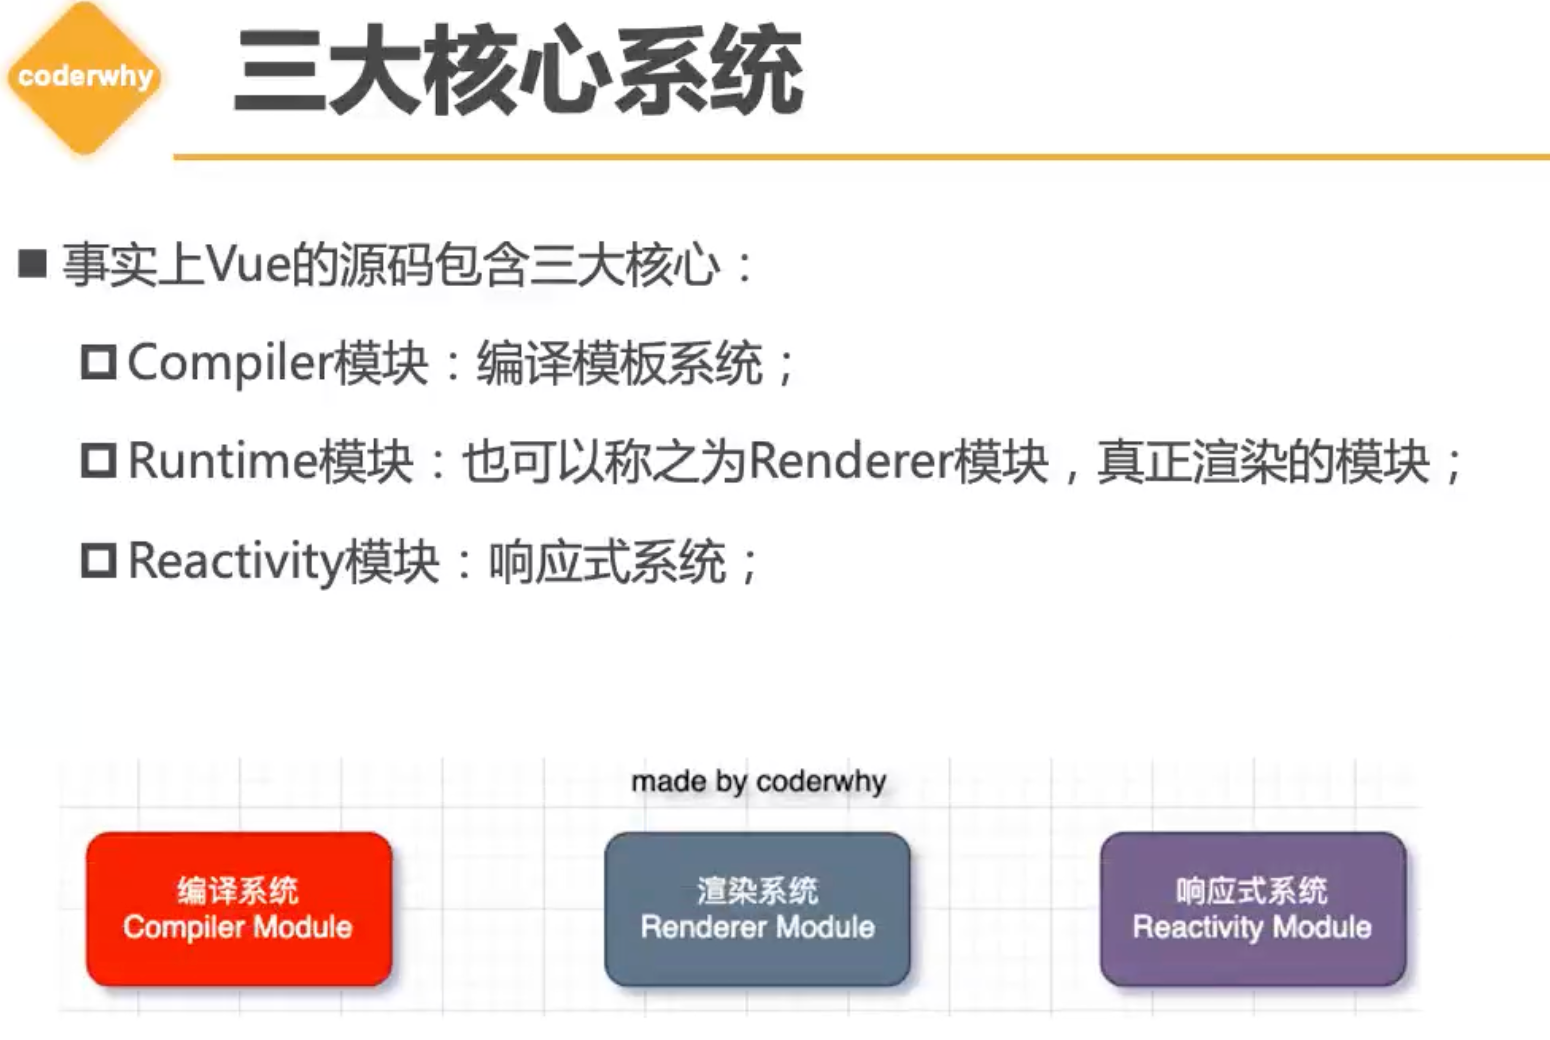
三大核心
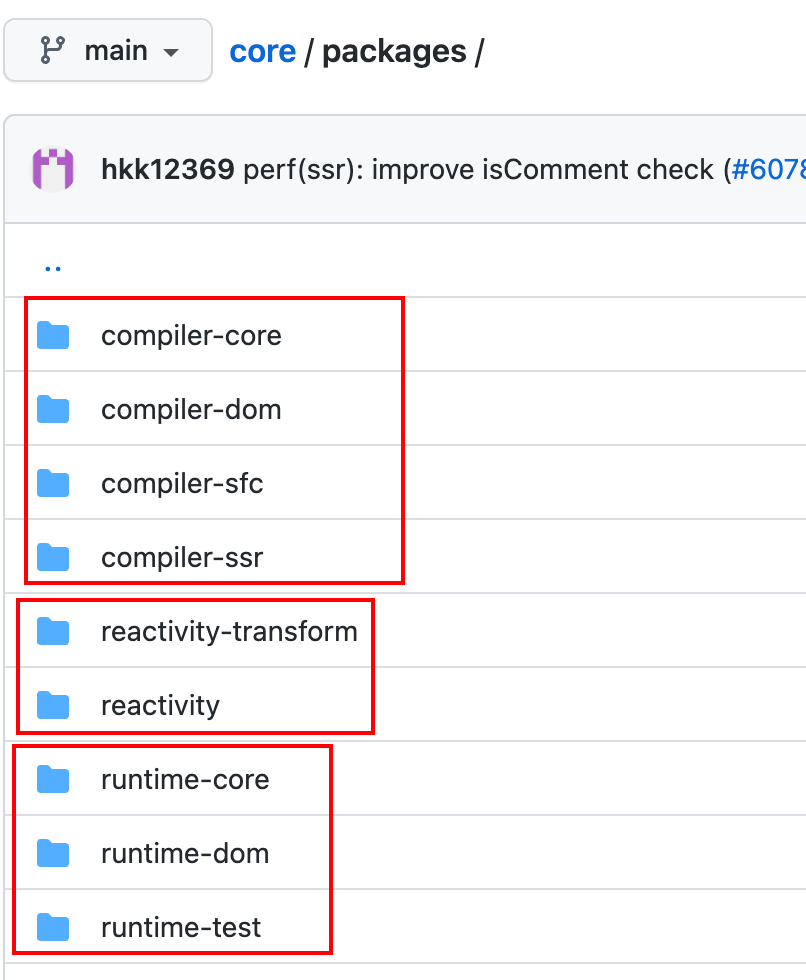
三大系统协同工作
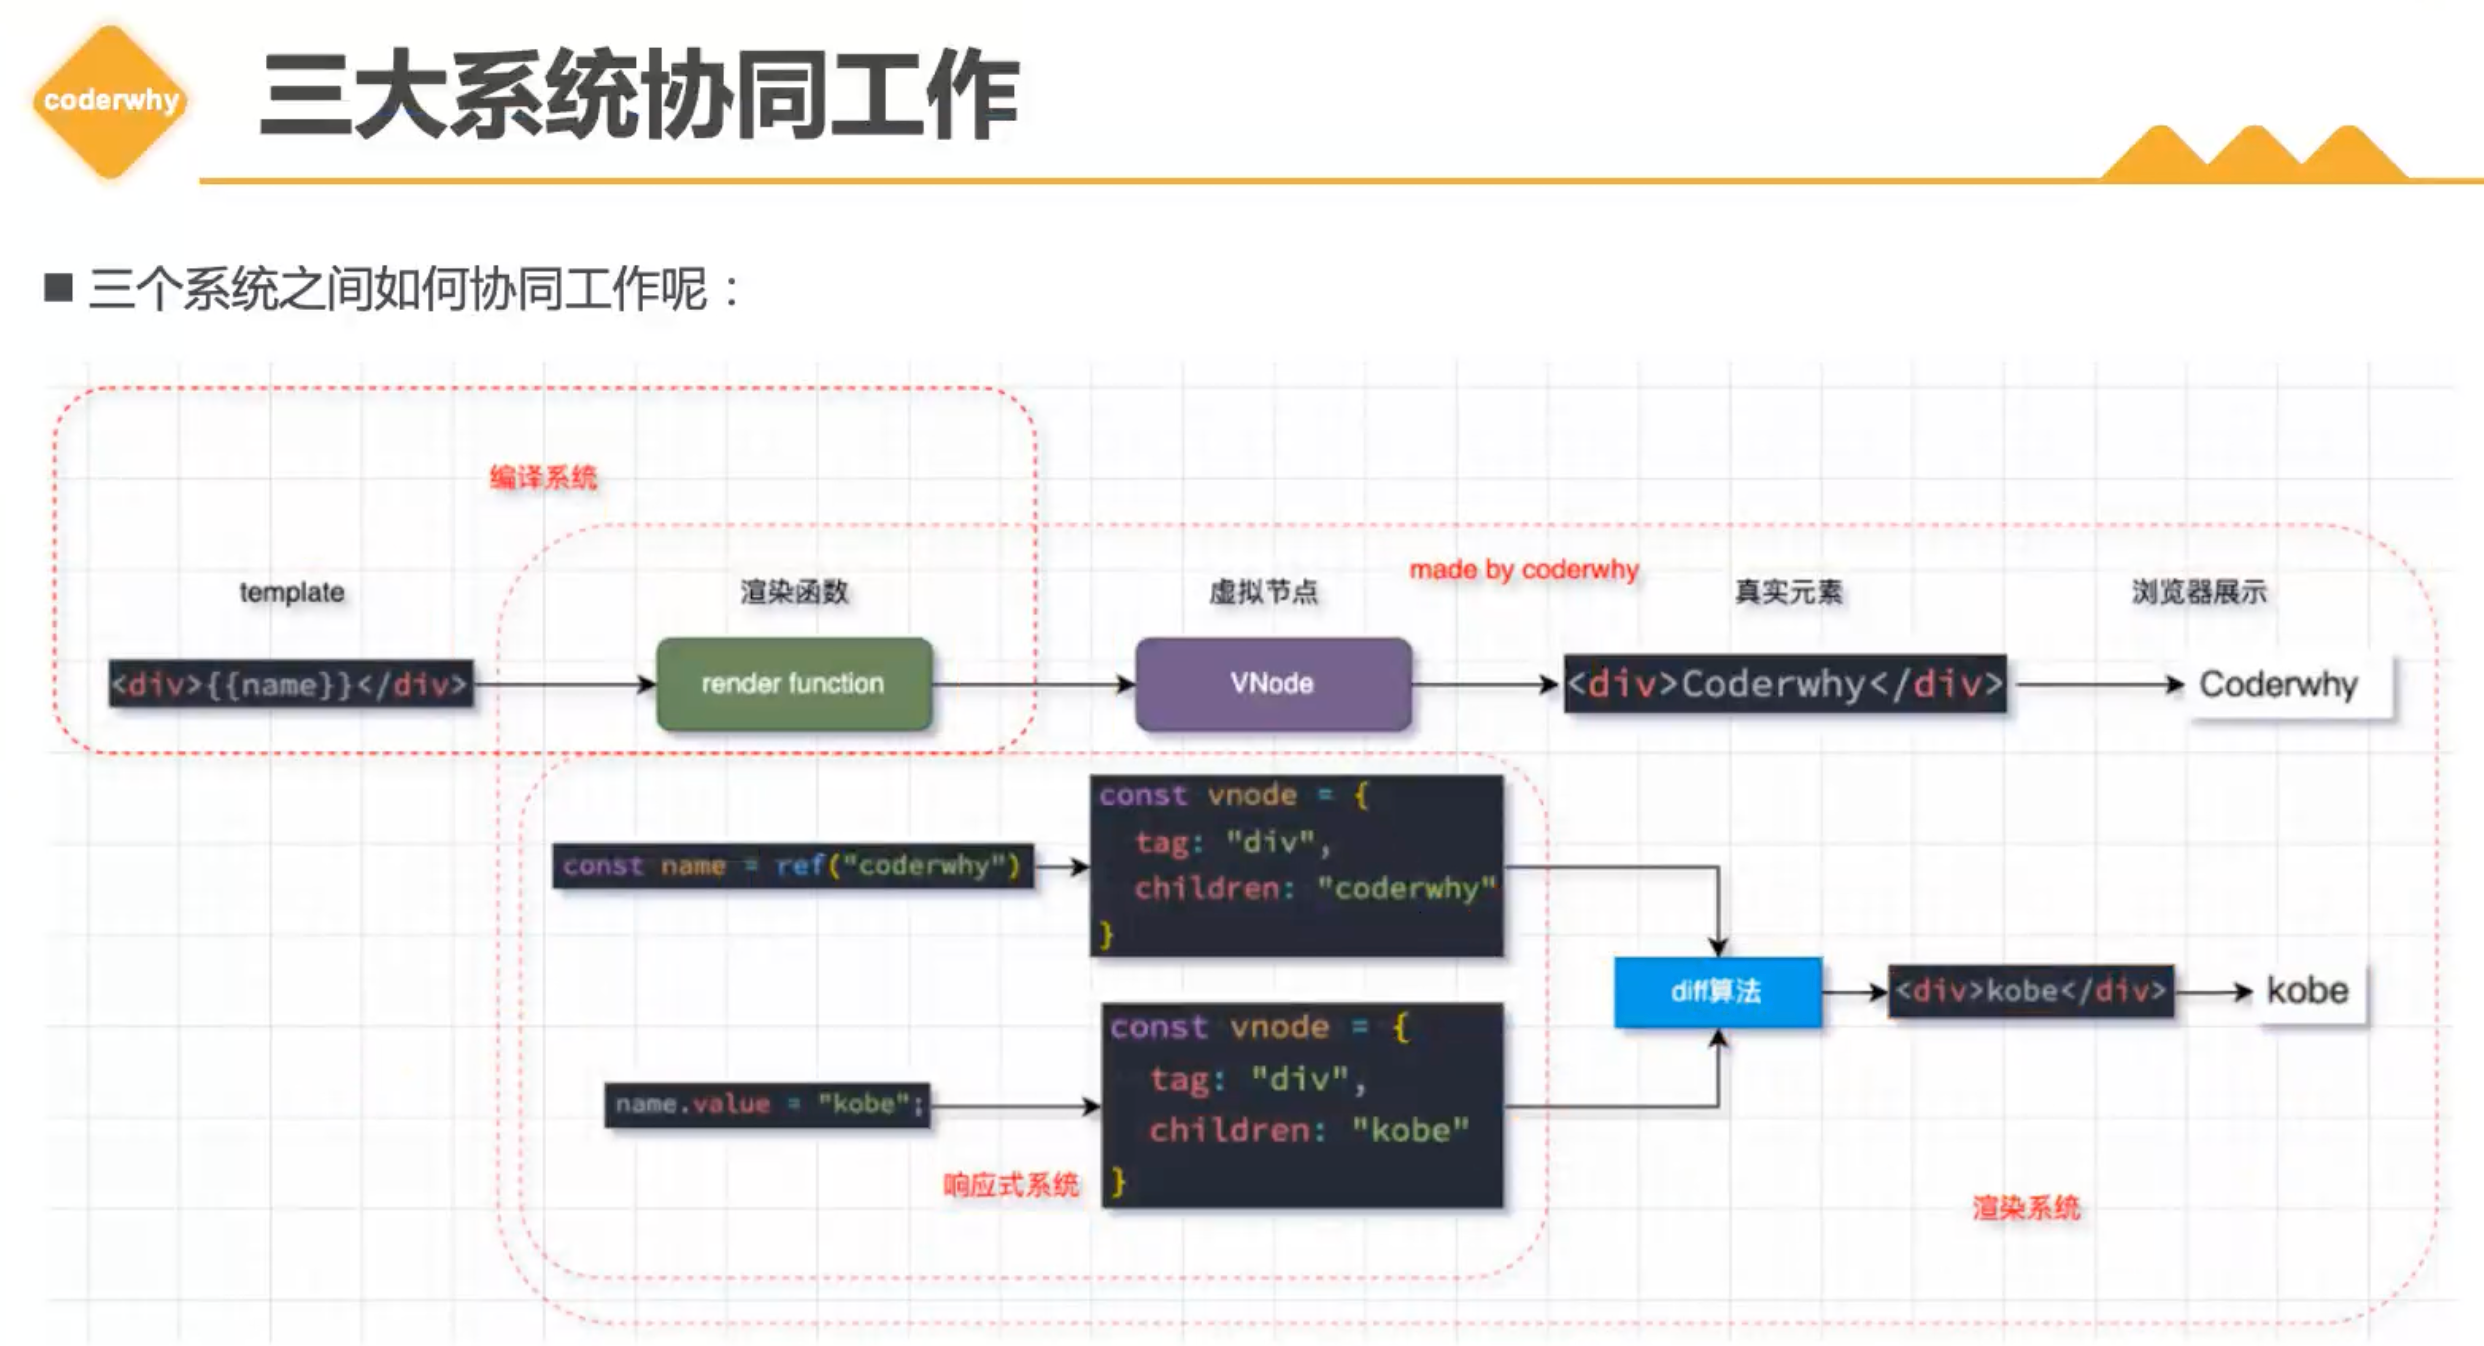
Mini-Vue

渲染系统实现
- h函数,用于返回一个VNode对象
- mount函数,用于将VNode挂载到DOM上
- patch函数,用于对两个VNode进行对比,决定如何处理新的VNode
h函数
| const h = (tag, props, children) => {
return {
tag,
props,
children,
};
};
|
mount函数
1
2
3
4
5
6
7
8
9
10
11
12
13
14
15
16
17
18
19
20
21
22
23
24
25
26
27
28
29
30
31
32
33
34
35
36
37
38
39
| const mount = (vnode, container) => {
const el = (vnode.el = document.createElement(vnode.tag));
if (vnode.props) {
Object.keys(vnode.props).forEach((key) => {
const value = vnode.props[key];
if (key.startsWith("on")) {
el.addEventListener(key.slice(2).toLowerCase(), value);
} else {
if (
Object.prototype.toString.call(value) === "[object Object]" &&
key === "style"
) {
let styleWord = "";
Object.keys(value).forEach((key) => {
styleWord += key + ":" + value[key] + ";";
});
el.setAttribute(key, styleWord);
} else {
el.setAttribute(key, value);
}
}
});
}
if (vnode.children) {
if (typeof vnode.children === "string") {
el.textContent = vnode.children;
} else {
vnode.children.forEach((child) => {
mount(child, el);
});
}
}
container.appendChild(el);
};
|
index.html
1
2
3
4
5
6
7
8
9
10
11
12
13
14
15
16
17
18
19
20
21
22
23
24
25
26
|
<body>
<div id="app"></div>
<script src="./renderer.js"></script>
<script>
const vnode = h('div', {
class: 'box',
style: {
width: '100px',
height: '100px',
'background-color': 'red'
}
}, [
h('span', {
style: {
color: '#000'
}
}, 'hello world')
])
console.log(vnode);
mount(vnode, document.querySelector('#app'))
</script>
</body>
|
VNode => 一个JavaScript对象里面有很多属性,最核心就3个属性,分别是 tag、props、children
patch
一个简单的patch函数
- 判断tag是否相同
- 判断props是否相同
- 判断children是否相同
1
2
3
4
5
6
7
8
9
10
11
12
13
14
15
16
17
18
19
20
21
22
23
24
25
26
27
28
29
30
31
32
33
34
35
36
37
38
39
40
41
42
43
44
45
46
47
48
49
50
51
52
53
54
55
56
57
58
59
60
61
62
63
64
65
66
67
68
69
70
71
72
73
74
75
76
77
78
79
80
81
| const patch = (n1, n2) => {
if (n1.tag !== n2.tag) {
const n1ElParent = n1.el.parentNode;
n1ElParent.removeChild(n1.el);
mount(n2, n1ElParent);
} else {
const el = (n2.el = n1.el);
const oldProps = n1.props || {};
const newProps = n2.props || {};
for (const key in newProps) {
const newValue = newProps[key];
const oldValue = oldProps[key];
if (newValue !== oldValue) {
if (key.startsWith("on")) {
el.addEventListener(key.slice(2).toLowerCase(), newValue);
} else {
el.setAttribute(key, newValue);
}
}
}
for (const key in oldProps) {
const newValue = newProps[key];
if (!newValue) {
if (key.startsWith("on")) {
el.removeEventListener(key.slice(2).toLowerCase(), oldValue);
} else {
el.removeAttribute(key);
}
}
}
const oldChildren = n1.children || [];
const newChildren = n2.children || [];
if (typeof newChildren === "string") {
if (typeof oldChildren === "string") {
if (newChildren !== oldChildren) {
el.textContent = newChildren;
}
} else {
el.innerHTML = newChildren;
}
} else {
if (typeof oldChildren === "string") {
el.innerHTML = "";
newChildren.forEach((child) => {
mount(child, el);
});
} else {
const commonLength = Math.min(oldChildren.length, newChildren.length);
for (let i = 0; i < commonLength; i++) {
patch(oldChildren[i], newChildren[i]);
}
if (newChildren.length > oldChildren.length) {
const newChildrenLength = newChildren.length;
for (let i = commonLength; i < newChildrenLength; i++) {
mount(newChildren[i], el);
}
}
if (newChildren.length < oldChildren.length) {
const oldChildrenLength = oldChildren.length;
for (let i = commonLength; i < oldChildrenLength; i++) {
el.removeChild(oldChildren[i].el);
}
}
}
}
}
};
|
响应式思想
1
2
3
4
5
6
7
8
9
| const info = {counter: 100}
function doubleCounter() {
console.log(info.counter * 2)
}
doubleCounter()
info.counter++
doubleCounter()
|
小改进,加入dep一个收集依赖的类。
1
2
3
4
5
6
7
8
9
10
11
12
13
14
15
16
17
18
19
20
21
| class Dep {
constructor() {
this.subscribers = new Set();
}
addEffect(effect) {
this.subscribers.add(effect);
}
notify() {
this.subscribers.forEach((effect) => effect());
}
}
const info = { counter: 100 };
const dep = new Dep();
function doubleCounter() {
console.log(info.counter * 2);
}
dep.addEffect(doubleCounter);
info.counter++;
dep.notify();
|
以上代码只有一个dep,那么不能控制多个对象和属性,如
1
2
| const info = { name: 'Hbisedm', age: 19}
const div = { width: 100 }
|
若使用上面代码,改变一个对象内的属性,都会运行所有的effect副作用函数。
所以需要把对象以及属性都分别抽离出去。=> Map 这种数据结构适合我们的需求
1
2
3
4
5
6
7
8
9
10
11
12
13
14
15
16
17
18
19
20
21
22
23
24
|
const targetMap = new WeakMap();
**
* 每个对象的属性都有一个dep,用来收集依赖
* @param {对象} target
* @param {对象的属性} key
* @returns 依赖收集的实例
*/
function getDep(target, key) {
let depsMap = targetMap.get(target);
if (!depsMap) {
depsMap = new Map();
targetMap.set(target, depsMap);
}
let dep = depsMap.get(key);
if (!dep) {
dep = new Dep();
depsMap.set(key, dep);
}
return dep;
}
|
那这个getDep方法应该在创建响应式对象的时候就使用
1
2
3
4
5
6
7
8
9
10
11
12
13
14
15
16
17
18
19
20
21
22
23
24
|
function reactive(raw) {
Object.keys(raw).forEach((key) => {
const dep = getDep(raw, key);
let value = raw[key];
Object.defineProperty(raw, key, {
get() {
dep.depend();
return value;
},
set(newValue) {
value = newValue;
dep.notify();
},
});
});
return raw;
}
|
每次方法调用使用个函数包装下,实现响应式。
1
2
3
4
5
6
7
| let activeEffect = null;
function watchEffect(effect) {
activeEffect = effect;
effect();
activeEffect = null;
}
|
reactive
1
2
3
4
5
6
7
8
9
10
11
12
13
14
15
16
17
18
19
20
21
22
23
24
25
26
27
28
29
30
31
32
33
34
35
36
37
38
39
40
41
42
43
44
45
46
47
48
49
50
51
52
53
54
55
56
57
58
59
60
61
62
63
64
65
66
67
68
69
70
71
72
73
74
75
76
77
78
79
80
81
82
83
84
85
86
87
88
89
90
91
| class Dep {
constructor() {
this.subscribers = new Set();
}
depend() {
if (activeEffect) {
this.subscribers.add(activeEffect);
}
}
notify() {
this.subscribers.forEach((effect) => effect());
}
}
let activeEffect = null;
function watchEffect(effect) {
activeEffect = effect;
effect();
activeEffect = null;
}
const targetMap = new WeakMap();
function getDep(target, key) {
let depsMap = targetMap.get(target);
if (!depsMap) {
depsMap = new Map();
targetMap.set(target, depsMap);
}
let dep = depsMap.get(key);
if (!dep) {
dep = new Dep();
depsMap.set(key, dep);
}
return dep;
}
function reactive(raw) {
Object.keys(raw).forEach((key) => {
const dep = getDep(raw, key);
let value = raw[key];
Object.defineProperty(raw, key, {
get() {
dep.depend();
return value;
},
set(newValue) {
value = newValue;
dep.notify();
},
});
});
return raw;
}
const info = reactive({ counter: 100, name: "张三" });
const div = reactive({ width: 122 });
watchEffect(function () {
console.log("info1:" + info.counter * 2);
});
watchEffect(function () {
console.log("info2: " + info.name);
});
watchEffect(function () {
console.log("div1: " + div.width);
});
info.name = "李四";
div.width = 33;
|
reactive: 做数据劫持
getDep:根据对象和key拿到对应的dep实例
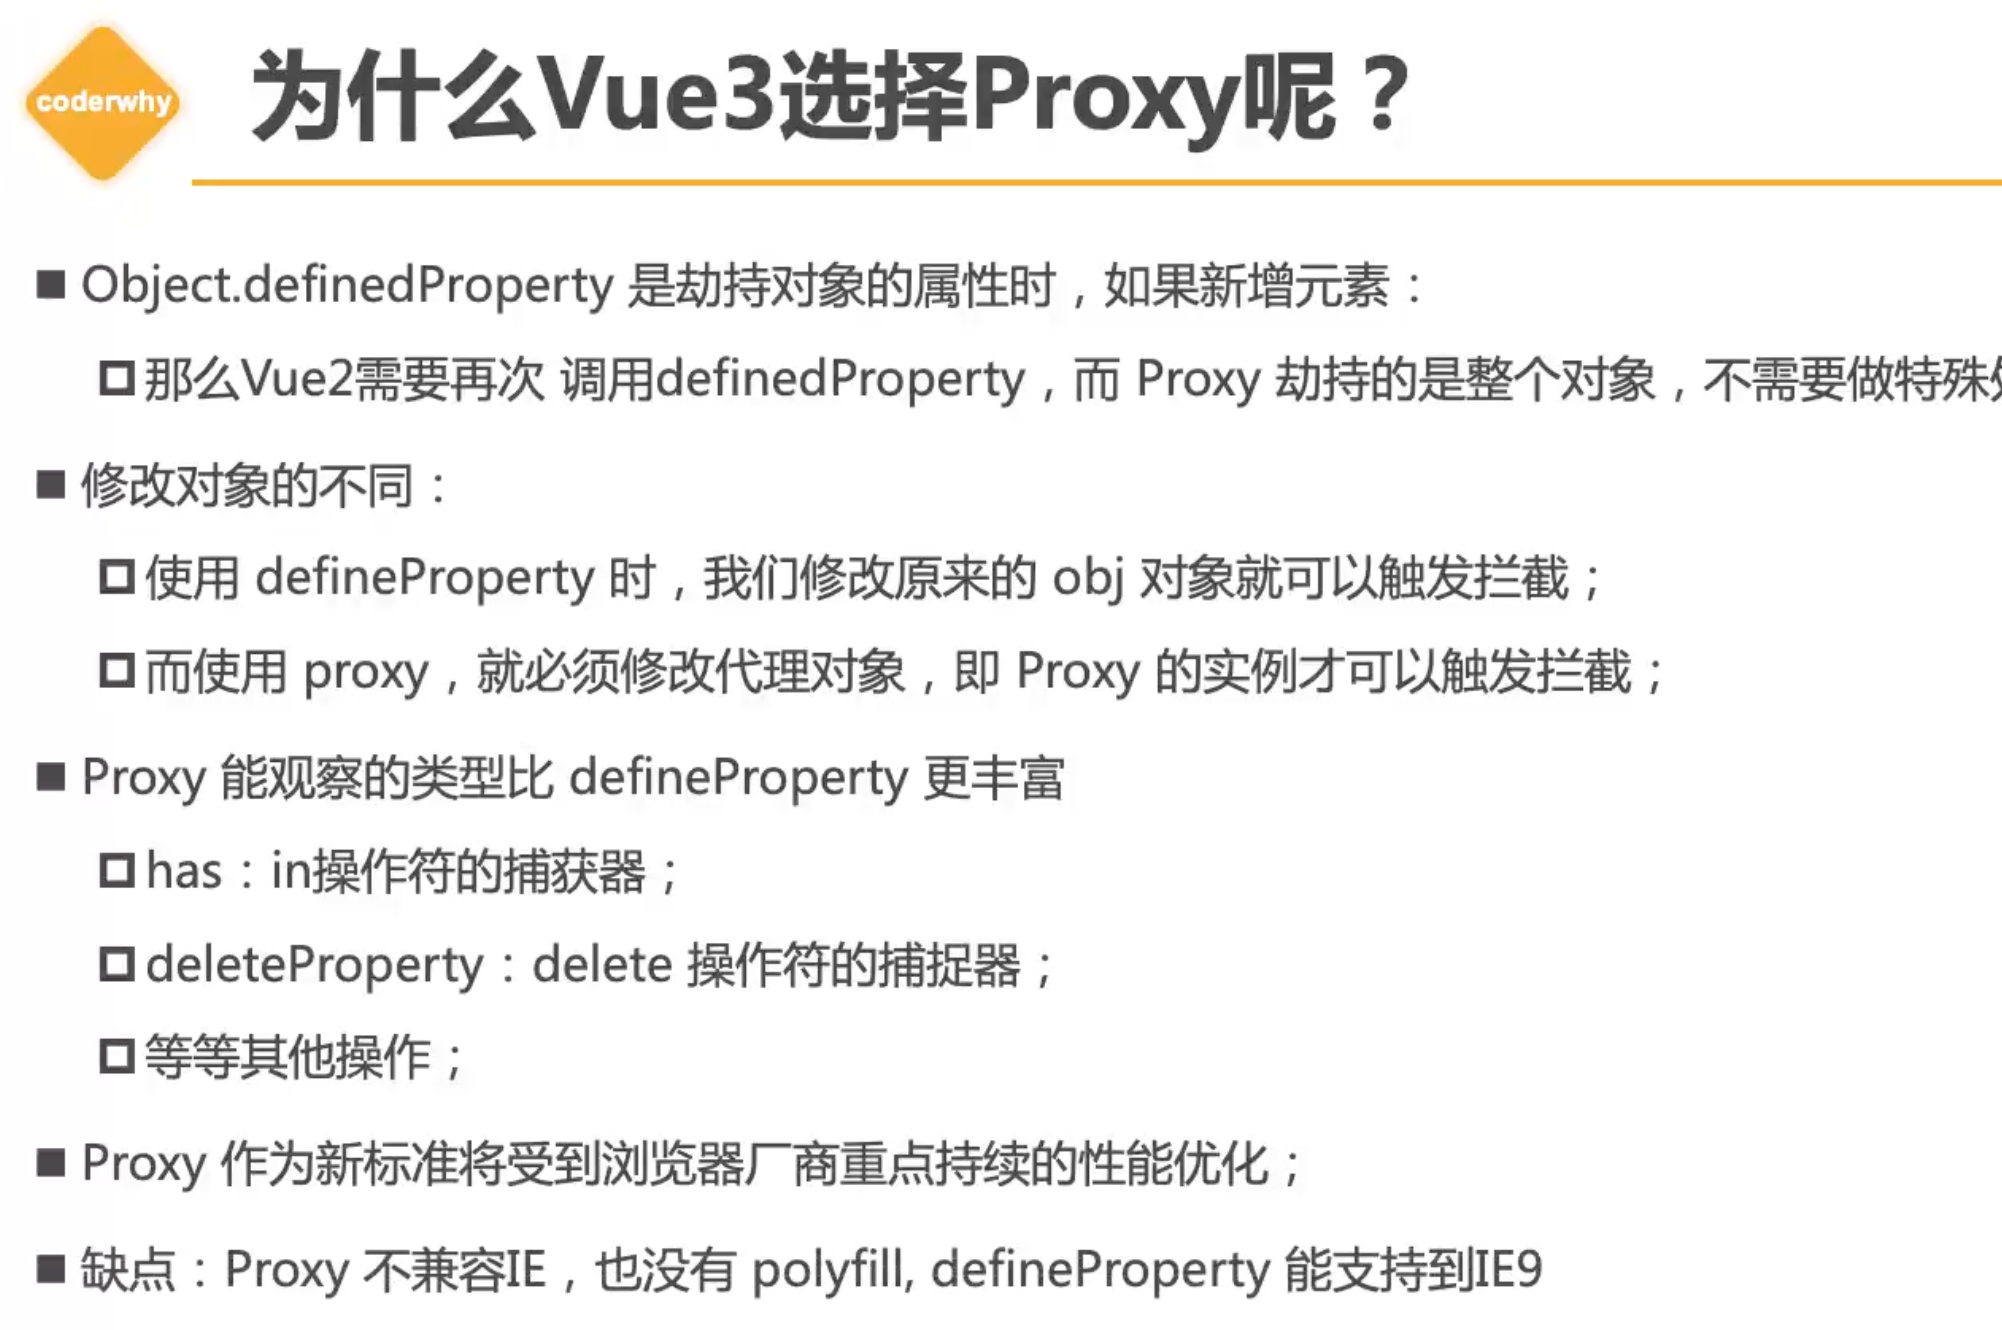
reactive vue3
1
2
3
4
5
6
7
8
9
10
11
12
13
14
15
16
17
18
19
20
|
function reactive(raw) {
return new Proxy(raw, {
get(target, key) {
const dep = getDep(target, key);
dep.depend();
return Reflect.get(target, key);
},
set(target, key, value) {
const dep = getDep(target, key);
const oldValue = target[key];
if (oldValue !== value) {
Reflect.set(target, key, value);
dep.notify();
}
return true;
},
});
}
|
createApp
1
2
3
4
5
6
7
8
9
10
11
12
13
14
15
16
17
18
19
20
21
| function createApp(rootComponent) {
return {
mount(selector) {
const container = document.querySelector(selector);
let isMounted = false;
let oldVNode = null;
watchEffect(function () {
if (!isMounted) {
oldVNode = rootComponent.render();
mount(oldVNode, container);
isMounted = true;
} else {
const newVNode = rootComponent.render();
patch(oldVNode, newVNode);
oldVNode = newVNode;
}
});
},
};
}
|
使用上面写的渲染renderer.js、响应式系统reactive.js、createApp
1
2
3
4
5
6
7
8
9
10
11
12
13
14
15
16
17
18
19
20
21
22
23
24
25
26
27
28
29
30
31
32
33
34
35
36
37
| <!DOCTYPE html>
<html lang="en">
<head>
<meta charset="UTF-8">
<meta http-equiv="X-UA-Compatible" content="IE=edge">
<meta name="viewport" content="width=device-width, initial-scale=1.0">
<title>Document</title>
</head>
<body>
<div id="app"></div>
<script src="../03响应式系统/reactive.js"></script>
<script src="../02渲染器实现/renderer.js"></script>
<script src="./index.js"></script>
<script>
const increment = function () {
App.data.counter++
}
const App = {
data: reactive({
counter: 0
}),
render() {
return h('div', null, [
h('h2', null, `counter: ${this.data.counter}`),
h('button', {
onClick: increment
}, '+1')
])
}
}
const app = createApp(App)
app.mount('#app')
</script>
</body>
</html>
|
源码
前往github vue3
执行
可以发现打包文件在packages/vue/dist/vue.global.js
然后在packages/vue/examples/创建个demo.html,并引入刚才打包好的vue.global.js
编写html
1
2
3
4
5
6
7
8
9
10
11
12
13
14
15
16
17
18
19
20
21
22
23
24
25
26
27
28
29
30
31
32
33
| <!DOCTYPE html>
<html lang="en">
<head>
<meta charset="UTF-8">
<meta http-equiv="X-UA-Compatible" content="IE=edge">
<meta name="viewport" content="width=device-width, initial-scale=1.0">
<title>Document</title>
</head>
<body>
<template id="sam">
<div>
{{msg}}
</div>
</template>
<div id="app"></div>
<script src="../../dist/vue.global.js"></script>
<script>
const App = {
template: `#sam`,
setup() {
return {
msg: 'Hello Vue!'
}
}
}
const app = Vue.createApp(App);
app.mount("#app");
</script>
</body>
</html>
|
接下来研究下它的这个js文件如何执行的。


